Winter/Christmas Themed Python Project

In this project, I made a scene that I named Snowville that is customized based on what the user wants. You can try it out yourself with this link to my code. It is my Christmas themed turtle python project with snow at the top and a person on the very left, some wrapped presents, a snowman, and a Christmas tree with ornaments at the bottom. This was the project that I spent the most time on and it is the one that I am most proud of. Because it is customized, it can be a little different a little time. The main thing I used a lot in my code that I never used before is using the console to have print commands. Then, I have the user type something and based on what they type, the code does a certain thing. I haven’t done that before and that is the main thing I am proud of. It is interactive unlike my other projects. Another thing I used a lot in my code were functions. I did a little bit of functions in my previous projects, but I didn’t understand it that well. While doing this project, I used a lot of functions and that greatly shortened my code. I definitely felt good about that. The code starts out with print commands in the console that greet the user to Snowville. Then, it draws a person over and over again across the screen. I wanted to make it look like a person walking across the screen. After that is the snow. It first draws some snow at the top. Here comes the first customization part. The code asks the user if he/she wants more snow in the scene. If the user types yes, the code will draw more snow, and if he/she says no, then the code will move on. Next is the snowman. The code asks the user what the size of the snowman should be. It gives the options of small, medium, or big. I made it so that it would draw the same snowman but with different sizes based on which size the user types. After that is the presents to the left of the snowman. With this part, the code gives options for what color the presents should be. Like the snowman, I used a function so the code would draw the same objects but the color could vary. The last part of the scene is the Christmas tree. This was the part that took the longest because I decided to have two variables: the color and the size. I had to make multiple functions and different variables. I was eventually able to find a way to include both the color of the ornaments as a variable as well as the size. Here is an example of a possible scene with possible choices:

Let’s look in depth at each of the parts in this code.

First, I imported commands from the turtle and random libraries. Then, I needed the background color to be black so that I could have the things drawn in white be visible. The way to do this is a little weird, but I needed to create a screen variable so I could set the background color. Now, I had to figure out how to use print commands. Just the console printing something is just print, so I started out with that and greeted the user. Then, I needed to find a way to have the user type something and then have to code retain that information to use it later. I looked it up, and I found that I needed to create a variable and do raw_input which would allow the user to type something. Since the thing that the user typed was stored as a variable, I could use it in the line below. I had to print something and the thing that I needed to print was a little complicated. I needed to combine strings of text. This isn’t too hard, but I had to change some of the spacing so it looked like one string of text. After I had a good idea of how to use print commands, it became easier to use them later on. Next, I created the user’s body, which is the white stick figure. I started out making the basic code to draw the figure, but then I wasn’t exactly sure how to make an animation so that it looked like the person was going across the screen. I had a little knowledge of functions, and it seemed that using a function here would make the most sense. That is because, for this animation to work, I would have to draw the person over and over again, just moving him over to the right each time. So making a function would save lots of code. Then, I made a repeat loop because I needed to draw the person and then move him over to the right. That is just what I did. Using a variable for the x position of the body, I was able to move the body over each time it was drawn. Apparently, I looked up that setting the speed to zero means that everything that was supposed to be drawn would be drawn as fast as possible. That was good, because then the drawings of the body would show up faster. So in the end, it just looks like a bunch of bodies on top of each other, but it sort of looks like the body is moving across the screen. It’s sort of an animation. After it drew bodies all the way to the end of the screen, everything was cleared and a body was drawn on the bottom left. That made it look like the person kept walking and now was stepping into a new place. And that place is Snowville.

Now, for the winter/Christmas themed aspects of the project. First, I did the snow at the top. This was pretty simple for me. It was the only time I used random commands since I was randomly putting randomly sized snow at the top. Still, this time the function was a little different. Since I wanted to repeatedly make snow in different places on the screen, I needed parameters in the function since that is the thing that I want to change in the snow function. I decided to randomize the size of the snow since snow doesn’t necessarily drop down in the same size with a variable. Since I made it so that the x and y position of the snow could change, in the repeat loop where I call the function, I made the x and y position randomized in a range so that the snow only appears at the top. Then, I made some basic console exchange between the code and the user. This was the first time I made the code do something based on what the user wanted. Now, this sounded familiar. I asked the user if they wanted more snow or not. If the user said yes, more snow would be drawn, otherwise, it wouldn’t. That would be an if/else command. I used if/else in the past so I knew what to do. I decided to print some text based on the user’s decision to make it more like a conversation and to make it more entertaining.

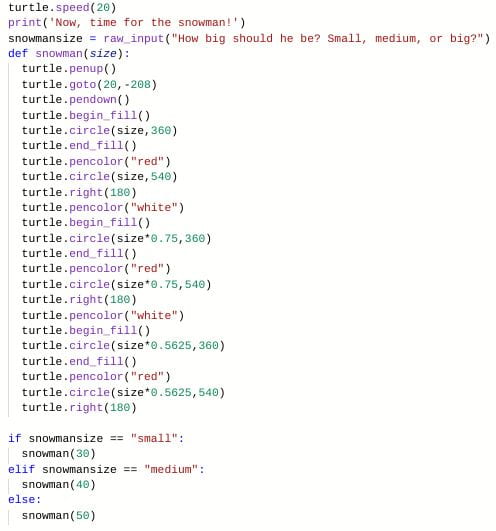
Next, I coded the snowman in the bottom middle. Based on my knowledge when I coded to snow, I already generally knew what to do. Since a snowman is always white, but could be tall or short, the customization I wanted was the size. First, I coded it so it printed three options for the user: small, medium, or big. Based on what the user typed, the same snowman was drawn, just with a different variable. The parameter with this function is the size. The code in the function is a little interesting, since I wanted to use math to have a distinct relationship between the top, middle, and top layers of the snowman and I wanted it to be proportional. So the parameter is the radius of the bottom circle of the snowman, which is the biggest. After it drew the bottom circle, I coded it so the middle circle would be 3/4 the size of the bottom circle. For the top circle, it would by 3/4 the size of the the middle circle, which is 9/16 the size of the bottom circle. This made the snowman look nice. Now, after I ran this, I noticed that the top circle was kind of blending in with the snow. So, to make the snowman stand out more, I created a red outline around the snowman. This made things slightly more complicated. Before, I just had the color set as white and that was it. Now, I needed to switch between white and red. First, the turtle would go around 360 degrees and fill in that circle white. Then, the pencolor would be red and the turtle would go around again, making a red outline. The turtle would end up at the bottom, so I made it 540 degrees to make it travel to the top. It would continue on like that with the middle and top layers. The code in the function is slightly long, but then the if/else part where the code actually runs is super short because I used a function.

After that, I did the presents. This took some thinking, but once it was done, I thought the presents turned out pretty nice. For the presents, the thing I wanted to change was the color, so the user could pick what color their presents should be wrapped in. This one had two functions and then if/else commands to run the code. At first, I wasn’t exactly sure how I wanted to code this and I didn’t really have a clear idea of what I wanted the present portion of the scene to look like. I knew I wanted three presents, but I didn’t know how I would put them together. I just started out getting everything set up so I had the formatting done. I did the print conversation first. Then, I figured, since I was going to be using many different values, it might be easier if I use a list. So the list holds all of the possible colors that the user could chose from. I later named it presenttreecolor because this list is also used for the tree. After that, I created a function for the presents. I made the pencolor white so the outline of the presents would be white and I made a parameter, color, so that I could make the fillcolor the color that the user chooses. I figured out where I wanted the presents to be on the screen and set the x and y position of the the turtle to that using the goto command. Next was just the if/else commands. This was slighly different since I had if the user said a certain color, it would run the presents function with the color corresponding to the list I made. But the if/else part sort of looks more organized because I used the list. Now that everything was formatted, when I ran the code to test out my code for building the presents, it would add the conversation with the user and it would color the presents what the user wanted it to be. Then I started coding the presents because I didn’t want to create a function just yet. I made the first rectangle a horizontal and kind of big sized present. I tried to make sort of an angular present next to that first one, but it didn’t look right to me. So I made a vertical and long rectangle next to the first one. It looked a little weird having presents side by side, so I made a little overlap with the presents so it looked nicer. When I look at these presents, they look a little boring and empty. I thought it would be cool if I could make ribbon sort of things over the presents. This was a little more challenging because I needed to navigate to the middle of a side, change the pen size and pencolor, and go across. I did a little white on the ends of the ribbon because otherwise the ribbons might blend in with the background. At this point I could make a function. For this function, there is three parameters. the length and height are the length and height of the present. The transition parameter is the distance that is the overlap of the presents. The rectangle was straightforward with the parameters. The ribbons, though, were a little tricky. I used the forward commands and the parameters but then I had to modify the parameters, like height/2 to get in the middle of the side. When I got to the ribbon, I needed to change the pensize, go forward a little, change the pencolor to black, go forward the rest of the way minus the little white at the end, change the pencolor back to white, go forward a little, and change the pensize to what it was before. Slightly complicated, but still not too bad. This stage of my project taught me more about making good use of and modifying parameters in functions.

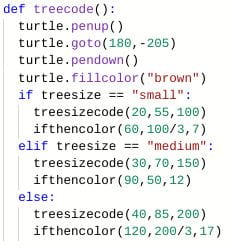
The last thing is the Christmas tree on the bottom right. This part was certainly the longest and hardest part of the code. This is because I wanted the user to get to pick two things: the size of the tree and the color of the ornaments. Figuring out how to combine both of those things was a little tough. First, I made the console code so I could get that done. In the end, I ended up creating four functions just for the tree. Then, all the code runs is just the treecode function! I’m glad that worked out otherwise my code could’ve been really long. I started out just doing the code for the tree without the ornaments. I decided to create the function right away because I felt like I got the hang of the way I used functions in my code. In the function tree code, I got everything set up with the colors and the x and y position. Then, I did the if/else commands for the size and then put the function I was going to put the code for the tree in the if/else commands. For the treesizecode function, there are three parameters. Size1length is the length of the trunk of the tree, size1height is the height of the trunk, and size2 is the length of a side of the green part of the tree (all sides are equal length). So the first part draws the trunk, which is a rectangle. This part is clear. Using the first two parameters, it was easy to make the trunk. Finding out what the values for the parameters were going to be for the different sizes took a bit of trial and error. Then, the transition between the trunk and the green part took some thinking. After the trunk is drawn, the turtle is on the top left corner of the trunk. I needed to get to the point that would be where I would draw the next side. I needed to code the base of the triangle minus the trunk and the part on the right. At first, I thought the formula would be size2/2-size1length, but that would be the wrong order. The bottom side is the length of the trunk, and the remainder of the side. Split that in two and that would be the part I wanted. So the formula is (size2-size1length)/2. Then making the triangle wasn’t hard. It would be size2 and then 120 degree turn, since it is an equilateral triangle, which means it’s also equiangular.

Now, I had to add the ornaments. I wanted to make a different function for the ornaments because I would rather split my code up into more functions that are shorter than have one long function with many parameters. So I made the treecolorcode function for the ornaments. Before I started coding that, I wanted to do the if/else commands which would be for the color. So in each of the if/else commands seeing what the size should be, I needed to put a big if/elif/else command. There are many elif (else if) commands because there are many colors the user could choose from. Now, seeing that there was that if/elif/else command in three different places was a little annoying. I could just make a function for that. So the function, ifthencolor, has that whole part. Then I wouldn’t have to repeat a bunch of code. That was all the functions. The functions are inside one another. Treecolorcode is in the function if thencolor, which is in the function treecode, which is the function that runs. Now, I had to figure out the parameters for treecolorcode.

This is where things started to get more complicated. After the treesizecode function is done, the turtle is on the top right corner of the trunk. I wanted it to be at the bottom left corner of the green triangular part of the tree. This distance is length1. The formula is the whole side of the triangle minus the length of the trunk and minus the whole side minus the length of the trunk divided by 2 (size2-(length1+((size2-length1)/2). Doing some math with the values from the three different sizes, I got the right values and put it in the three corresponding if/else parts in treecode. But then I realized, the function that I put in was ifthencolor, and the function that had the parameters was treecolorcode. So I had to fix that problem. I had to sort of think backwards. Treecolorcode has parameters. The function that runs treecolorcode is ifthencolor. So I needed to set values for the parameters in treecolorcode. But then those values depended on if the size was small, medium, or big. So I found out that I actually had to make parameters that are basically the same as treecolorcode so that I could just put in the values in treecode, where I ran ifthen color. So the values I put in for ifthencolor would be the values for treecolorcode. It was a little confusing at the start because of the functions inside functions thing I was doing, but I got it eventually. Later on, as I was coding treecolorcode, I added two more parameters: length2 and radius. For the ornaments, the turtle would go up 1/3 of the way to the end of the side, make an ornament, and then do that again. So I needed another parameter for that distance, which would just be 1/3 of size2 in my treesizecode function. This distance is length2. The radius is the radius of the circle. Tee size of the circle matters because, for example, if it’s a small tree, there’s got to be smaller ornaments than if it’s a medium sized tree. The first repeat loop is going forward length2 and making circles with a radius of the parameter radius on the left side. Then the second repeat loop is on the right side. I had to make two different repeat loops because the left and right commands are switched. Like I said, quite a bit of thinking and work, but I overcame it.

At the end is just a closing message in the console. So, that is all the work I did for the project. It was very fun to do, I learned a lot more about print commands and interaction with the console as well as applying functions to make code that repeats a lot shorter. Using print commands was always a thing I wanted to do, so I decided to do it in this project. I thought it was an interesting idea. The things that I drew aren’t that detailed or anything, and that is because I just wanted to a little of everything and fill up the screen with those things. Also, I allowed the user to actually sort of have a conversation with the code and have some control over what they wanted to see. Overall, I was very satisfied with my learning experience with this project and with the end result.

The Python Maze Challenge

In this challenge in turtle python, I was given code for a maze and I had to try to find a solution that would work every time. Here is a link to my project. The maze was randomized though. The overall structure was the same every time, and there was a pattern and it was based on math, but it was certainly a very difficult challenge. I tried many times to figure out what math I could do to ensure that the turtle gets through the maze, but I couldn’t find a complete solution. However, the learning process that went through trying to find a solution was the important part. The maze was made by variables that were in lists. The variables were r1, r1, r3, etc. and t1, t2, t3, etc. The turtle would first go forward r1, then the gap is made by t1, and then the part after the gap is also made by t1. Then, the turtle goes back the other way, still using r1 and t1. Then, it uses r2 and t2, and so on. So there was a pattern. Here is a picture of what I ended up making:

As you can see, it didn’t quite do what I had planned it to do. This is what I thought about while I was trying to come up with a solution. First, I thought I had to make the turtle go forward r1+(t1/2) since that would make the turtle go in the middle of the gap. Then, I made the turtle turn right, go forward to go into the next part of the maze, and then turn right again. I couldn’t do r1+t1/2 again because the turtle would already be 3/2 t1 forward instead of the turtle being all the way at the right side. From the right side, that first part is a distance of r1 and then that gap is a distance of t1. So I needed to do some math with the variables. I did r1+(t1/2), which would be the whole length I wanted the turtle to go to, and then -(3/2)t1. Then, I combined like terms and came up with r1-t1. I decided to do that for all of the r and t variables. So I made b1, b2, b3, etc. so it would be easier. I put those b variables in a list. For my code, I said go forward r1+(t1/2), then create a loop that is go forward mazeturtle[i] (my list of b variables that I created), turn right 90, go foward 40, and turn right 90. When I ran it, it went completely all over the place. The turtle sometimes went through the first two gaps, but then the rest was all off. Sometimes the turtle didn’t even get through the second gap. It was going off the screen.

I needed to do something different. I looked more closely on what exact math I needed to do. I realized that after it gets through the first gap, it should go forward b1, but then it’s different. The turtle would need to go forward r2-(3/2)t1 since the turtle really needs to subtract whatever line is above it. Then, +(t2/2). I realized that I needed to do make it so that it combines whatever r variable and t variable the turtle is on (would need to be t variable divided by 2) and then subtract the previous t variable times 3/2. So I created another list called d so that I could make variables like that. Then I put it into an array. This time, I instead of stopping after the turn right, forward, turn right in the repeat loop, I said go forward turtlemazer, which was the list of all the d variables. Then, I said turn right, go forward, and turn right. When I ran the code, it was doing some weird stuff. That plan wasn’t working either.

This was the time when I realized why sometimes it was going through some gaps and sometimes it wasn’t. The turn right, go forward, turn right doesn’t work every time. Sometimes, depending on the r and t variables, the turtle will actually have to go the other way. So I can’t just say that it will work every time the way I was doing it. Perhaps just going forward also wasn’t the way to go. I realized that perhaps my somewhat complicated math was just not the way to do it. So I decided to instead change the b and d variables. B1 is now 800-((3/2)*t1)) because the first distance the turtle would have to go is the full length(800) minus 3/2 of t1. I made that with all of the b variables, thinking that it would work since it wasn’t just based on going forward, but based on going forward the whole length minus the length it doesn’t need to travel. For the d variables, I just figured to do the opposite. (I don’t really know why. It just made sense since the turtle would be going the other way.) I just figured I could switch the expression in the b variables around to make the d variables. For example, d1 is ((3/2)*t1)-800. I just wanted to see what happened when I made these the variables. When I ran it, it was making weird rectangles around the first two parts of the maze. It was weird. I decided to switch the second right in the right, forward, right parts to a left, so it became right, forward, left. When I clicked run, I was not going all over the place, instead, it was going in the snakey sort of way that it was supposed to go! It was supposed to snake around the maze through the gaps. The only problem was, it wasn’t going through the gaps and it was sometimes not in the middle of the lines, but instead, directly on the lines. The turtle wasn’t aligned properly. The turtle was also going all the way to the left side of the maze. So the math was also off. I noticed that the turtle wasn’t going all the way down, and I figured, even if it wasn’t exactly going through the maze how it was supposed to, I figured I may as well make the turtle start and end in the correct places.

This was very simple to do. The turtle was already in the correct position to go forward and go through that last gap. So I made the turtle go forward r9+(t9/2) since the turtle was all the way to the left side of the maze anyways. Then, I made the turtle go right 90 and then go forward to get past the end of the maze. This is the code that I wrote for this project:

This was the partial solution that I came up with and, I gotta say, it isn’t bad. I was able to keep improving my project so that it wasn’t doing some crazy stuff like going way off the screen or repeatedly making overlapping rectangles in a line. I was able to try a few different things. Although I didn’t completely finish a solution that fully works, I’m happy that I was able to use good problem-solving, use logical thinking, and learn a lot about setting, modifying, and using variables. That was the main challenge for this project. It was all about making sure everything the turtle was doing was dependent on the variables. I needed to make sure I was modifying the variables I already had and perhaps made new variables. Then, I needed to make sure I was using the variables properly so that it works every time. I learned a lot about these kinds of things that I had never practiced before. I can see why my code that I have right now isn’t quite working. The d variables are the reason why it’s going all the way to the left side of the screen. Perhaps, if I were to keep working on this project, I could go with the idea of touching the left side of the maze, going back to the next gap, and going through the gap. I could go all the way to the end, and then trace back my turtle a little. There would be a little overlapping in the track through the maze, but it would still work. That would be how I would keep going with this project. I know what is wrong right now and I can sort of think about how to fix it, and that’s the main point of this challenge. This maze coding project was certainly an interesting and thought-provoking one. Sometimes completing and finishing it isn’t the most important part. The important part for me, and the part that improved my coding abilities and my mind in general, was the process through this fun, sometimes frustrating, and somewhat mind-boggling coding challenge.

Python Turtle Race

In this project, I used python turtle using repl.it. This was my first big project in python. In my previous coding art projects, I just used block coding turtle art. Now, I have transitioned into an actual coding language called python which was cool for me. I had learned a bit of javascript before and I noticed that python had a lot of the similar concepts. I was happy that I was coding a cool project using python. So for this project, I made a turtle race where there was a referee and 5 shapes racing. At the beginning, the referee would draw the starting line and finish line. Then, text that the referee turtle wrote would appear. It would say “Racers, to the starting line!” Then, five shapes would appear. They would go to their places that I set for them and they would all go on the starting line. After the shapes all were in place, the referee would write text that said “And… Start!” Then, the shapes would race, leaving a trail with the color that I set for each of them behind them. When one of the shapes reaches the finish line first, the referee would write text that “Race finished! [insert shape, for example “Triangle”] won! Then all of the turtles would stop moving and the race would be over. This was a pretty cool project I made and I felt like I used a lot of commands considering I just started learning python pretty recently. It wasn’t that hard to learn all of the commands because most of them were similar to the block coding turtle art as well as javascript which was a language I learned in the past with Khan Academy. Here’s a picture of what it looks like when it is all done:

Here’s how I coded it. As always when starting a project with python turtle, I have to say import turtle so that I can import commands from the turtle library. I also had to say import random because later on, I use commands that are from the random library. Then, I had to make all of my turtles. I just decided to name them turtle1, turtle2, etc. There were 5 racers, but then there was one referee turtle, which I named refturtle.

Next, I did the code for what the referee does before the race starts. These commands were really easy, perhaps even easier than dragging blocks over. I first set the speed because I wanted everything to do a little faster. The first penup, goto, pendown part moves the turtle to where I want to start drawing the starting line. Then, I just used basic move commands to draw the line. Then I did the same thing with the finish line, just with a different coordinates. Now, I’d say one of the trickiest parts of my code was the text. I had to look up how to do text because, although I knew the general idea of how to do text in javascript, I wasn’t quite getting it to work. I realized that I had to put style for setting the font and the size of the text and then I had to put the write command for the actual text. I put the text I wanted to, this time it was to tell the turtles to get the the starting line, set the font to style, and centered it. I had to do some trial and error to get this to work but I was eventually able to get it. Then, I hid the turtle so that it would be clean.

Next, I had the part where the turtles went to the starting line. It seems like a lot of code because I have to do similar code 5 times because I need to it for 5 turtles. I made them all a different shape, which was simple since I just made them basic shapes, so that they would be unique. Then I made them all a different color so that it was more entertaining to watch. I used the goto command, which is the same as the setxy command in turtle art, to make them go to the starting line. I used penup/pendown so that it wouldn’t draw the lines when it was doing the goto commands.

This is the little section for the referee turtle to start the race. I had to use this tricky text thing again, but since I already did it once, I knew what to do and it was easier. I didn’t have to reset the style since I could just keep it the same.

This was the hardest but also the most involved part. This is the part that actually is the code for the race. First, I had to put the whole thing in a repeat loop multiple times because the turtles would keep needing to move forward. It doesn’t matter how many times I repeat it because there is going to be a break command at the end which will stop the whole code. It probably doesn’t need to be 500, but I wanted to make it a big number so I can make sure the turtles can make it to the finish line. The repeat loop wasn’t the hard part though, the if else parts were. Honestly, it wasn’t that hard because I already had in mind what I was going to do, but I had to do a bunch of fixes and changes until it worked the way I wanted it to. All of these if/else parts are practically the same, but with a different if because it mattered which turtle got to the finish line first and then what the referee turtle would display based on that. These if/else blocks are basically saying if any of the turtles reached the x value that was where the finish line was (less than and x coordinate of 340, using a command I had to look up called xcor which meant x coordinate), then move the turtles forward a random amount from 1-10. This was so that all of the turtles would not go at a steady amount because if that were the case, it would be obvious who would win right at the start and it wouldn’t be realistic. In a race, there is competition and there are parts when some players might be going faster and some slower, but then later in the race, some players might go slower or faster, so basically, they’re speed changes throughout. With the repeat loop and the forward a random amount, I was able to do just this. I had to figure out all of the syntax and formatting. Also, it took me a while to get this whole repeat loop, then if/else, then the code in it. If any of the turtles in the race weren’t less than 340 which was the finish line, basically meaning that they got to the finish line, then a different thing would happen and the race would end. This was under the else part. If one of the turtles got to the finish line, I put code that made the referee turtle put another text command. I made it so that the text corresponded to which turtle the code was associated to. I was happy when I was able to get this much working. So I was able to make it so that the referee would know what turtle got to the x coordinate that was the finish line first, but I couldn’t make it so that the turtles stopped. I needed some command that just ended the whole code. So I had to look it up and I realized all I had to was put the command break at the end of each of the if/else things which stopped everything in the code. That was all of the code I wrote to make my python turtle race project.

I was very happy with this project because it was awesome that I made a pretty clean and cool project with python. Python was something I have always heard about in the past, but I’ve never actually learned it. I realized that it isn’t actually as hard as I originally thought it was. So I was proud of the fact that I used so many commands that were a little difficult to figure out, especially the text commands and the if/else section. I learned a lot while doing this project because I needed to learn new commands to do the thing I wanted to. I had to do some research on how to get the text thing to work properly because it wasn’t doing anything at the start. The problem was I wasn’t doing the style command before the write command so it didn’t know what font or size to put the text as. Also, I thought I actually had to put the coordinates that I wanted the text to go somewhere in the text command, like it was a parameter of it. All I had to do in reality was make the turtle that I wanted to write the text get set the coordinates. It took me some time to get those coordinates right because I wanted to space out the text along the top of the screen. I learned how to do those random commands which are always fun to use because then it makes it more interesting since it’s not the same every time. In the first projects I did, I was only importing commands from the turtle library but this time I actually imported commands from the random library which was something that I had to learn. The if/else thing was a thing that I also had to learn how to get right. I was getting confused with checking what the x coordinate was so that I could make code for it. I also had to get used to the if/else because I didn’t use it much in turtle art. I did use it when I was learning some javascript but python had a different style and syntax. At first, I didn’t even think I would want an if/else command but I realized it would be so much more helpful because then I could just make the turtles move forward based on if they reached the finish lines or not. It say the most unique part of my project is the fact that my turtles are all different shapes and colors and the fact that there is a referee turtle that makes it feel like an actual race experience, with the referee talking to the racers and announcing the winner. The referee saying those three text commands are the most unique part because text commands are commands that aren’t used all that often that I saw in other projects. if I kept working on this project, I would do two main things. One, I recently learned how to use functions to shorten your code when you have a section of code that repeats a bunch. A function would certainly be used in the if/else part because the code is pretty much all the same, with just one part changed: the text that the referee says. That could be a parameter in the function so it would work out well. In addition, I would make the code more interesting. Although the start and end is pretty interesting, the actual race isn’t that interesting. It is cool to watch the turtles race and seeing how the turtle in first place changes throughout, but other than that, there isn’t much to it. If I made the trail behind the turtles cooler or made the turtle that won do something else, that would be cool. Still, this python project is definitely a project that I am proud of and worked hard on, it looks pretty good, and I learned a lot from it.

Inspired Turtle Art Project

For my next Turtle Art project, I made something that I am proud of because I used many new concepts and codes and it took time to fix everything and figure out how everything works. My artwork is called “A Pleasant Day” because it has two bright suns, a geometric rainbow tree, and some nice colored rain around everything. I was inspired by three really cool, but kind of complicated turtle art projects. One is called “Sunrise” which was where I got the idea of having the two suns. Another is called “Rain” which was the project that my rain was based off of. The one that is one of the coolest projects I have seen and the project that I really wanted to incorporate in my artwork is called “Treeglow” which I used and modified to create a tree in my artwork. All of these projects were really cool, and I though of how it would be nice to make a fantasy-like nature scene. So I decided to have a tree in the middle, but I made it rainbow, I made two bright suns to add lots of sunlight to the tree, and I made some colored and calm rain around all of it to give water to the tree. I basically combined the three projects mentioned, but I changed the codes in them and added some code so I could make everything look nice like a painting and to make it my own. Here is a picture of my beautiful artwork made by turtle art:

I learned a lot because the projects I based my project off of had commands that I didn’t use, at least in turtle art, so I was able to grow a lot with this project. There were a lot of random elements, so the project is a little different every time. Let’s look at the code to make this in detail.

I had a clear block so that everything would reset and be cleared before the code started. Then, I made a background. I had to use this new block called fill to make it. I used a set shade block and the background command to make the whole screen black. Then, the code would run the rain, the suns, and the rainbow tree, which are all action blocks.

This part was the part that was the most confusing for me and that took the longest. I used the code from “Rain” and made some changes. In the beginning, I just had the rain be anywhere on the screen using the random blocks on the set xy. But that couldn’t work since I had different objects. So that huge purple part with all of the boolean commands makes it so that it only makes a raindrop (code for raindrop is explained later) if it is within three areas which makes it go generally around the suns and the tree. The if then block helped to do that and I made it check 100 times so it usually only draws 20-30 raindrops. The boolean part took a long time to do, but after that, I ran the code and it didn’t work. This was really confusing. I thought that maybe the boolean was always false or something like that, but they looked fine. I just couldn’t figure out why it wasn’t drawing any raindrops. Then, one day, I realized that I never actually set the x and y so it was always false since it couldn’t check! It was a simple fix that made such a big change. I just made the x and y to be random and I made it so it could be anywhere on the screen. So if the boolean was true, then it would draw the raindrop to wherever it was set to and then repeat again. If it was false, then it wouldn’t draw a raindrop and it would just repeat so that it wouldn’t be covered up by the tree or the suns. I was happy when I finished it.

I feel like I need to explain the whole boolean thing because there are so many commands and they are all on top of each other. Since it is hard to see in the previous picture, I expanded and broke the code apart so it is easier to follow. The measurements, I’d say, were the hardest part. I had to figure out what numbers to put, which would be which places the rain is allowed to be. To figure those numbers out, I looked at my tree and suns (will be explained later) and measured out where the rain could go. Now I will explain all of the or, and, and inequality sign commands are. Since there were three different areas the rain could go in (above the tree and between the two suns, under the left sun and to the left of the tree, or under the right sun and to the right of the tree), I had to make or commands so that it would be true if any of the criteria in the three or blocks are true. The three of the parts of code in the three or blocks all have the same idea. There needs to be an and block with two and blocks that check if the x is greater than a certain value and less than a certain value and the same with the y. If all of that is true, then the turtle would draw a raindrop in that place, and then it would check over and over again, sometimes making raindrops and sometimes not, 100 times. The whole if part would be: if the x is greater than -550 and less than -300 AND y is greater than -300 and less than 75 OR x is greater than 300 and less than 550 AND y is greater than -300 and less than 75 OR x is greater than -515 and less than 390 AND y is greater than 130 and less than 200, then do the code in the then part of the if then block. This part of the code was sort of fun to do, but also complicated, confusing, and at times a little frustrating.

This part of the code was the code that made the actual raindrops. In the action block called rain, it had the overall code, set the x and y, and checked to see if it was in a good position. After that, if it was in a good position, it would go to this action block to draw the raindrop. To draw this, the turtle moves forward 1 with a big pen size and a darker shade. The turtle moves forward 1 70 times. While it’s doing that, the pen size is getting smaller and smaller by a tiny amount, but there is a noticeable difference when it looks like a raindrop because the pen size gets smaller. All the turtle is doing is drawing a straight line, but since the pen size is decreasing, the line gradually gets smaller and smaller as the turtle moves forward more, making a raindrop. You can see the gradient since the shade is getting slightly lighter each time the turtle moves forward. I should mention that this code was from the project, “rain.”

The next things the turtle draw are the suns. For this, I first learned how to use variables in turtle art. When I saw the code for “Sunrise,” I saw that there were blocks that were called boxes, and I didn’t really know how they worked. When I used them and tried them out in my code, I realized that they were just variables, which I knew how to use. Variables are used in code to store a value and then use the value in the code. First, I named the variables to be box 1, box 2, and box 3 (box 3 is used later). Then I was able to use those variables in the code. The repeat loops are the suns. The first repeat loop sets the variables, then does the action block called ray1 to draw one of the rays in a sun, changes the variables, and does what is in the ray1 action block again. The reason there has to be two ray1s in there is because first, the turtle draws a ray with a color between a certain range of choices. Then, the variables change, so then the color changes a little. This repeats 30 times because the code for ray1 is to draw one of the rays in the sun. If you see the picture, there are a bunch of rays that make up the suns. Since there are two ray1 blocks in the repeat loop, it makes 60 rays in one sun. This part of the code is similar to “Sunrise” but I changed some of the values and I changed pretty much all of the values in the action block ray1, but with the same idea. The same thing happens with the second repeat loop, but it makes the other sun in a different place. As you can see, the code is exactly the same but it has the action block called ray2 instead of ray 1. I struggled to figure out how to make two suns in different places, but then I realized that I could just make two different action blocks.

This is the code for the rays. As you can see, ray1 and ray2 have almost the exact same code, but there is one difference: the set xy. In ray1, the x and y are set to 425 and 175, which is the top right corner. So ray1 is the code to make a ray in the top right corner. Ray2 has the x and y set to -550 and 175, which means that it is the code to make a ray in the top left corner. This part was a little frustrating to me because I didn’t realize how I could make two suns with the exact same code, in different places. I had to have the set xy in it because otherwise it would just make it to where the turtle was before. The problem with that though is, I can’t just have a set xy block in the suns action block and then put a ray action block there, because then it would just go back to the first sun since there is that set xy block to go to a specific place. So I realized that I just had to create two action blocks, only changing the set xy. This part of code is based off of “Sunrise” but “Sunrise” has rays covering the whole entire screen. I just wanted to make a small sun and I wanted to make the colors a little different. As you can see, pretty much every value here is random, which means it is a little different each time. I put restrictions on what it can be, so the rays can’t be too short or too long. The boxes, or variables, are there so that the colors can be a little different every time the turtle makes a ray. I set the variables, then the turtle set the color be somewhere between those variables, which would make the color. To make the ray, the turtle goes forward and then turns, goes forward again, and turns the other way. That gets repeated three times, which means that it will go forward 6 times to make one ray. The thing is, sometimes the turtle only goes forward 7 and sometimes the turtle goes forward 20. That is because of the random blocks. The set heading command makes the turtle turn randomly around the point of what the x and y are set to and then the turtle makes a ray in that direction. The turtle makes a sort of zig-zag shape for a ray 60 times, each one being slightly different.

Now it’s time to explain my favorite part of my project. This part is where I learned the most in turtle art and I really like this complicated geometric tree. If you see the turtle creating the tree, you can see that the turtle moves very fast and almost looks like he’s dancing. This part of the code was what I mainly customized and made different from the project “Treeglow.” Basically what is happening is, the turtle starts out with a big pensize, a certain color, and a very light shade. The turtle then sets variables and makes one layer of the tree. Then, it goes back to this because there is a repeat loop and the action block treesetup is in it. After it makes a layer of the tree, the pen size decreases, the color changes, and the shade gets darker. The coolest part is actually seeing how the tree goes from being not detailed at all, to getting more detailed, adding more colors, and the shade getting darker. It looks really cool at the end, but I definitely need to give credit to the project “Treeglow” where this project was based off of. The changing of the color was the main reason it looks different from “Treeglow” and I also made more layers, adjusting the pen size change and the shade change.

This part isn’t much. Every time the turtle makes a new layer, it goes to -20, -275 which is where I decided to have the bottom of the tree be. It needs to be there so that the turtle will always go there every time it makes a new layer. It also makes sure the heading is 0, which means that the turtle has to be pointing north. This project is another project that has variables. With this project though, the variables are very important and make a big impact on the code. So the action block called treesetup is setting a few things before a layer of the tree is run. They are used a lot as you’ll see when I explain the code to draw a layer of the tree.

This part of code is super complicated and the part of code that I understand the least, but makes a really cool design. I’ll admit that I didn’t change much in this part of code because I thought that this design just looked so cool so I really wanted it in my project. I had to do some fixes after I realized that it wasn’t working the way I wanted it to. A huge thanks to the person who made this awesome code (from “Treeglow”)! The person really measured it out precisely and exactly so it would make the design perfect. Basically, this is the code that does the actual commands that draw the whole design or one layer of the tree. At the start, the pen size is so big that it just looks like the turtle is dancing around and not really doing anything. Then, at the end, you can see that the turtle is actually making a specific design with precise measurements. The main part of this code uses and if then block with the basic move commands that uses the box 1, box 2, and box 3 variables. Here you can see that the variables are getting modified with the basic operations and then are applied with the basic move commands. One thing to add is that I am not completely sure how this code exactly works since this code is from the project “Treeglow” and there was this code that was advanced. The if then block, I’m pretty sure, is so that sometimes the turtle makes the bigger shapes in the tree and sometimes it makes the tiny branches. When I ran the project slowly, it seemed like when it went to the action block tree, it would keep running the if then block, the main thing depending on what box2 is, until it reached the end of the first layer. Then it goes back to the rainbow tree since there’s that repeat block, changes a few things, and then does that all again, eventually making 15 layers. I’m not exactly sure how all of the code in “Treeglow” works as a whole but I have the general idea.

That was a lot of explanation of my beautiful pleasant day scene made with code. It took a long time to figure out how everything worked and what I wanted to change and I had to do many fixes, but I learned a ton while working on this project. Although I didn’t make it from scratch (inspired projects), I still learned many new turtle art and coding concepts. I eventually was able to make something gorgeous and pretty, and it was based off of and inspired by turtle art projects that I really liked.

Turtle Art Name Project

The next turtle art project I did was artwork using my name. How the project works is the turtle draws my name in a color, then moves and draws my name in a different color and a bigger pen size, and it draws my name across the screen four times. Then, the turtle moves below the first name it drew, and it draws another four names with different colors and increasingly bigger pen sizes. It draws four rows of four names in each row, making 16 drawings of my name in total. Then, the turtle goes back on top of my first name and does the exact same code as before, just changing the color. So what the code looks like is the turtle drawing 16 drawings of my name and then you see those names changing color constantly. Here is a picture of the artwork:

As you can see in the top left corner, the turtle is drawing over the orange Avi with a red Avi. For the code, I had to make three action blocks. One of the action blocks has a code that draws my name once. This one took a while because I had to figure out how to make letters out of code. I used the basic forward, left, and right blocks to make the letters. I used the pen up/pen down blocks to get to the next letter without drawing anything. For the dot in the letter I, I had to use an arc block with a very small radius so that it would just look like a dot. The next action block I made has a code that changes the pen color and size. This one was simple. I just used the plus blocks so that the turtle would draw a different color and bigger pen size each time. The last action block I made has the code that moves the turtle to get to the next drawing of my name. I had to use the set xy and the addition and subtraction blocks to do this. Basically, I figured out that I can set the x and y to be whatever it was before, plus or minus a number. Then, I was ready for the start block. I first set the x and y so that where ever the turtle was at, it would always go to the top left corner when the code starts. I made a fixed pen size and not a fixed pen color because I wanted to constantly change the color, and I only wanted to increase the pen size after the turtle draws the 16 names once. I used a repeat block to put the three action blocks in, drawing a row of my name, I added another set xy block which was the code to put the turtle below the row of names, and put that inside another repeat block so that it would happen four times. I put that all inside a forever loop so that the turtle would go back to the start and draw over the names with different colors.

This project was a fun project to do because it filled the whole screen and it was basically a grid of my name, with the turtle changing the colors constantly, which is a cool addition.

Turtle Art Houses Project

This is a post about one of my first turtle art projects. In this project, I created a house and then made a bunch of spiral houses, changing the pen color and size each time. Then I made a Pacman in the middle of the spiral houses.

I was going to do a full circle, but when I pressed play, it created a house at a different angle and then created the spiral of houses. So, instead of trying to figure out how to solve that, I just changed the code to make it different. The house is sticking out inside the circle that the houses are around. So I created part of the circle, then I made it turn and go straight and then turn the other way, and go straight. Then I made the rest of the circle. So that is the project. Here is a picture:

First, I made the code for a house. I made it go forward 150 and right 90 and put a repeat loop so it can draw a square. Then I made the turtle go to the top of the square to start drawing a triangle on top of the square. I made it go left 120 and forward 150. So that is the code for the house. Then I added the pen up block so that the turtle can move without it drawing. I did set x and y for the turtle to move, and then had some forward and turn blocks to get the turtle in position for the next house. Then I added the pen down block so that the turtle can continue drawing. I made an action block called house so that I could use that function since I wanted to draw multiple houses. Then I made a function called move, which is the code that makes the turtle move after it draws a house. I put pen up, then I added blocks to turn 10 degrees and move, and then I put pen down. The final action block I made was called pen. This function is the code that makes the turtle change the pen size and color each time the turtle draws a new house. It took me a while to figure it out but I eventually found that I could use the addition block since I would add the size and color by some amount each time. So I put set color and set size, and then I put the addition blocks in. Basically, I said take the pen color that it was at before and add 3. Then take the pen size that it was at before and add 0.5. So I had all of my action blocks. Then I was able to put those into my actual code. I first set the color to 0. Then I put a repeat loop and put the move, pen, and house action blocks in the loop. I made it repeat 37 times because that is how many times it would take to make a full circle. After doing that, I saw that the turtle made a house that wasn’t in the spiral and was not where it should be. So I decided to make a Pacman inside the spiral of houses instead of a circle. I used the arc block and made the turtle make one-fourth of a circle, then make half of a square, and then make the rest of the circle. I positioned it and changed the pen size and color to fit inside the spiral of houses. So the part where Pacman’s mouth is open is where part of the house is that is out of place. Here is a picture of the code for this project:

I was happy with this project and I enjoyed doing it. I didn’t have that much knowledge about the blocks in Turtle Art, but I was able to make something that I am proud of.

Things About Myself

My name is Avi and I am a 7th grader at Quest Academy. Quest Academy is a great private and gifted school that I really enjoy. The teachers challenge me and encourage me. One of my favorite subjects is math. I have always loved it since I was little and I still enjoy doing it. It is very logical and it exercises my brain. Over the summer, I did a lot of Khan Academy. Khan Academy is a free site that has lots of great exercises and videos.

I started doing math a lot, but then I explored some of the other things that Khan Academy offered. I did some grammar, reading, music, computer programming, history, and more. In addition, I like music a lot. It relaxes me and allows me to express myself. I do piano and I am pretty good at it. I did a choir at school, which I liked to do as well. I was taking Mandarin Chinese classes. Mandarin is a very widely spoken language so I wanted to learn it. I also do Spanish. I do Spanish in school, but I found a website called Duolingo. It is a good website to get me started. I also started doing a little bit of French on Duolingo, so that is cool. One of the things I like doing in my free time is biking. There is a biking trail very close to my house so my family can go biking when we want. A fact about me is that I am a martial artist. I have been doing martial arts for a bit over four and a half years and I am continuing to do it. I train at Kyuki-Do Martial Arts and I have earned my black belt from Kyuki-Do. I enjoy doing martial arts and I am good at it. I also enjoy cubing. Cubing means that I solve puzzles, especially twisty puzzles (like the Rubik’s cube) and I got a lot more puzzles for me to solve. I can solve different sizes and shapes. You can look at the official website called the World Cube Association.

Those are some things about myself.

Skip to toolbar